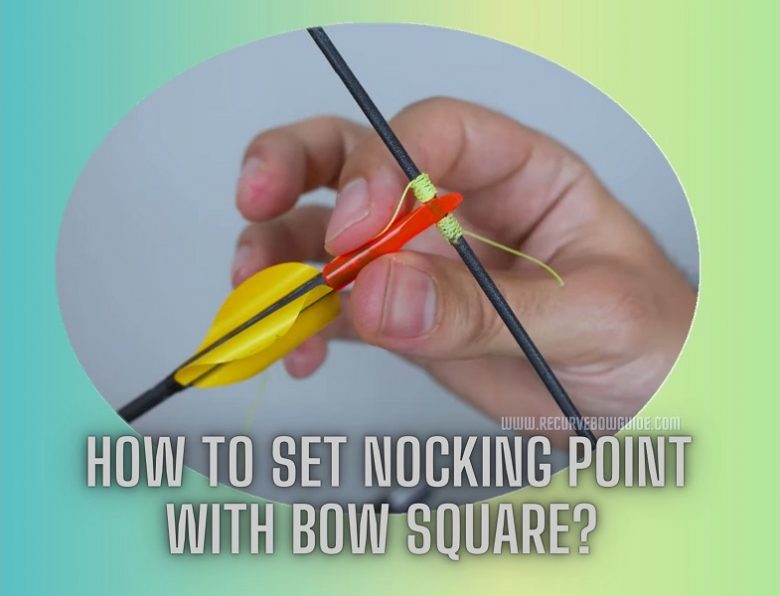
If you are an archer, you do know the importance of setting nocking point because, without it, you won’t be able to shoot the arrows in a straight direction.
You have to do it on the string, and to pinpoint the desirable spot, you can take the help of a bow square. After that, you can easily find out where to put your arrow.
So, the main question is how to set nocking point with bow square?
Don’t worry because the following article will cover it. Plus, if you want to know how to use a bow square for other purposes, we also have included the answer for your benefit. Read on to find out more.
The Proper Way to Set Nocking Point with Bow Square
Setting the archery nocking point is not challenging if you use the proper tools and techniques. Here is a step-by-step process that you can follow to get the job done.
Step 1: Clean Your Workstation
Before you start the task, it is best that you clean your workspace. If there are unnecessary tools on the table, please remove them immediately.
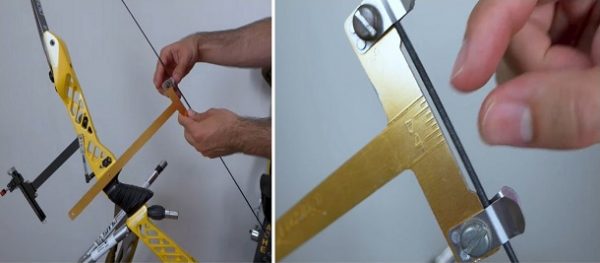
Step 2: Place the Bow Square on the String
Take the bow square and place it on the string. Don’t be in a hurry because this step requires precision. Then, you should slide the square down. Do it in a way that it easily rests on the arrow rest.
After you are done with that, you should place a nock set that is easily moveable on the string.
Step 3: Set the Nocking Point
It is time to set the nocking point. The process is very easy, and it won’t take that much of your time.
There is a measuring scale present on the bow square, and it will help you determine the nocking point. You should set it on the strings’ correct location.
For finger shooting, you should start the point at the height of 1/4-inch. Measure it from the nock sets’ bottom portion to an angle of 90 degrees on the bowstring.
If you use a release aid, you can start it at a height of 1/8-inch. That’s it. You are done setting the nocking point with bow square.
How to Use a Bow Square to Measure Tiller and Brace Height?
Yes, a bow square allows you to measure other stuff like tiller and brace height. This shows that this equipment can be a great investment if you want a proper shooting experience.
Below, you will find the way you can do these measurements on a recurve bow.
Measuring Tiller
This measurement affects the way your bow rests in your hand. If you don’t adjust the tiller correctly according to your shooting style, there is a possibility that the bow will either lean forward or backward.
Put the ‘T’ of the bow square against the top limb where it meets with the risers’ top portion. Note down the measurement to the string. Repeat the process with the bottom limb.
The distance between the top and bottom limb should be equal to 1/4-inch.To be on the safer side, you should check your bow’s specifications.
Measuring Brace Height
To measure the brace height, you should place the bow square into the bows’ pivot point. This point is the bow grips’ throat or narrow part. Now, you can easily measure the distance to the bowstring. Make sure you keep the bow square at 90 degrees to the string.
In this way, you can complete the task. Surprisingly, you can easily adjust the brace height. Jus twist or untwist the bowstring, and you are good to go.
How to Tie a Nocking Point?
This process is quite easy and simple. Check it out.
Equipment Needed
- Thread
- Scissor
- Lighter
- Bow square
- Glue (Hot-melt)
Step 1: Run the Thread through the Stick Containing Hot-Melt Glue
Start by running the thread through the hot-melt glue. This glue will be on the stick, so you don’t have to worry about burning your hand. Besides, the thread that you are using is for the arrow nocking point.
Keep in mind that this step is optional, but the good thing is, it works perfectly when you have to bind the thread to the string later on.
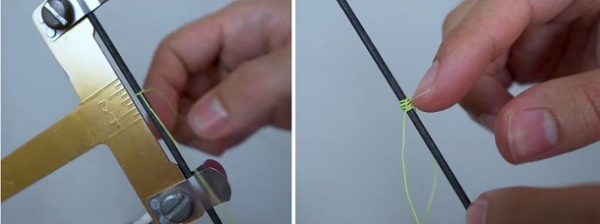
Step 2: Clip the Bow Square
Now, clip the bow square on the string and make sure it rests on the arrow rest. After that, proceed to the next step.
Step 3: Select a Mark above the Gauges’ Bottom Line
For the top nocking point, you have to select a mark that is located above the gauges’ bottom line. This approach allows your arrow to sit on the string.
Be mentally prepared to locate the perfect spot; it will take a bit of time and tuning. You can start with 5mm or 3/16-inches in an upward direction.
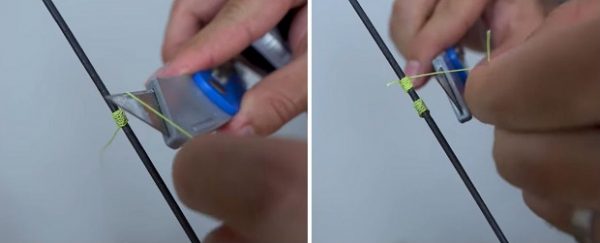
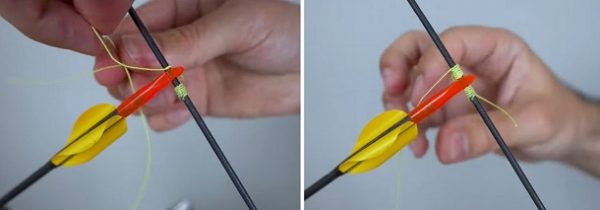
Step 4: Tie a Knot
Slowly loop the thread and do it around the string. In this way, you will be able to tie a knot on your desired location.
Then, tie another knot beneath the first one. Again, tie the third one above the original knot. Make sure that it faces the same direction as the others.
Constantly tie the knots on the top portion of the previous knots until you get the desired shape and size.
Step 5: Remove the Loose Ends
Take the scissor and cut the loose ends present on the thread. Do it slowly, or else you will cut too much.

Step 6: Use a Lighter to Heat the Threads’ End
Gently heat the thread’s end using the lighter, and don’t burn the string. You will notice that the material will slowly start to meltdown.
Once you are done with that, seal the threads by pressing down the molten ends on the nocking point.
Step 7: Finish It off
Nock your arrow to the string and repeat the process for the bottom nocking point. Keep a little bit of space so that you can easily move the arrow.
When the two nocking points are tied properly, you can start shooting without any hassle.
Congrats! You have successfully finished the task.
Frequently Asked Questions (FAQs)
Where should my nocking point be?
It should be approximately 1/4-inch above the arrow rests’ level. With this height, you won’t have a problem tuning the bow.
How do you set a nocking point without a bow square?
You can take the help of a regular speed square. Place the arrow in a way that it is properly straight against the rest.
Besides, you can even use a protractor or other type of equipment that has a square shape so that you get an angle of 90 degrees on both sides of the arrow.
How do you adjust the nock on an arrow?
Dip the nock in a glass of hot water. After you take it out, take a spoon and use its end to adjust the nock.
Conclusion
Now, you can easily answer how to set nocking point with bow square. Moreover, if someone asks you how to use a bow square, you won’t have a problem clearing out their queries.
Share this article with your loved ones. Have a good day.